Monday, September 29, 2008

First pizza - heaven!!


We had our first pizza party Saturday night - what a blast! The food was great, but it was just so much fun having a group of people around the oven, listening to music, drinking wine, sharing the communal plate of pizza. We made pizza with basil pesto, with sun-dried tomato pesto, with Italian sausage, with roasted peppers, with onions and basil and with of course cheese! We stoked the oven for three hours, and then cooked for about another three. The pace was perfect - we cooked one pizza at a time, passed the slices around, raked the coals over the sole of the oven and when we were ready for another pizza, we cleared out the embers, pushed the fire into the back of the oven, swabbed off the firebrick and slid another one in. Can't wait 'til next weekend! Party pix will be posted as soon as I get them from Larry. And how about a round of applause for the man who makes ALL my dreams come true!

The photo shows the steel studs in place before the cladding goes on. We're putting stone in the front and stucco on the sides.

Sunday, September 21, 2008

The chimney rises


This weekend, after many discussions about the shape and size of the arch (and an abandoned template or two!), the chimney throat was finished and the chimney flue went up. It was important to finalize our plans for the arch before the flue went in. The rest of the brickwork behind the chimney was cemented into place. Then the box was built around the oven in preparation for the cement pour today. We will clad the oven in about 3 - 5" of portland cement. We read somewhere about adding sand to this mix but we can't remember what kind of sand, how much or why. So a little research is in order before we really begin this pour today. (and before we go the Menard's!) Hopefully, at the end of the day, the cement is on and we will mortar the bricks into place for the outer arch. 

We lit a few small fires in the oven this week to dry the mortar out. Last night Larry, Elizabeth and I enjoyed sitting in the back yard with a fire glowing in the oven. It felt intimate and warm and magical. 

With luck and good weather (and God willing), we plan on cooking pizza next week!


Wednesday, September 17, 2008

First Fire!


Last night we started our first fire. We'll be having fires from now on to dry out the mortar - but we must keep them small so we don't develop cracks. The first shot is one my mom took before we had our fire. It's a good view of the arch inside. Next: the 3" of concrete cladding, then the vermiculite. We still haven't decided on the exterior cladding, but we have a good sense of the chimney and facade structure.

Monday, September 15, 2008

Day 6: Progress!


Well, the rain ended and we were able to lay a few more bricks for the front of the oven dome and the throat of the chimney. The outer stone hearth is now in position. Next, we finish the dome and start some small fires to dry everything out. 


Sunday, September 14, 2008

Day 6: Rain rain go away


Earlier today (while I was grocery shopping) Larry attached the stone hearth but now it is raining out and the oven is covered with a big blue tarp. Instead of working on the oven today, I'll make bread using an earthenware cloche, which is a bell-shaped contrivance that yields bread that is supposedly as close as you can get to wood-fired oven bread. The cloche certainly produces spectacular bread - I'll take pictures of that instead!


Day 5: Making the outer hearth

We bought a beautiful piece of rock yesterday - NY Bluestone. It is such a gorgeous hunk - I felt like we had a VIP in the back of the car when we driving around town! It will be used for the outer hearth. Before we could cement it in place, we needed to bring up the level of the front wall (on top of the cement blocks). We made a plywood form, attaching it to the block with some tap-cons, then poured concrete over some old bricks. We stuffed polyester stuffing (used for making toys) into the air space between the concrete block wall and the floating hearth slab. I used my new favorite thing - aluminum tape - on top of the stuffing and against the firebricks bricks to help release the form.


Friday, September 12, 2008

Day 4: Laying the hearth - the sole of the oven

Here are a couple views of the oven after Larry laid the firebricks in a bed of Heatstop (a sand and clay mixture). There is no mortar on the sides of the bricks that form the hearth. They are laid tightly together; they can be replaced if broken. The darker color red bricks are old St. Paul "capitol" pavers; they will used for the throat of the chimney and the outer arch. In the photos, you can see the plywood form for the arch. Larry was fitting the firebricks for the arch before mortaring them in place. After the first arch set up, he removed the form and positioned it to build the next arch row, and so on. After the oven dome is complete and the throat of the chimney is built, we'll be covering everything in Portland cement, so this is the last stage where we'll see the arch of firebrick from this angle.


Thursday, September 4, 2008

Day 3: Pour the Hearth Slab

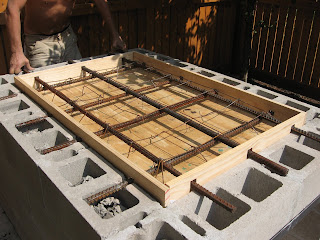
After building the walls on Saturday, Larry cut the 3/4" rebar that holds the hearth slab on top of the block walls. The hearth slab is poured so that there is an air space all around it to minimize the heat lost from the oven to the concrete blocks. The hearth slab is actually suspended above and between the block walls by the rebar. Usually, the longitudinal rods are the ones embedded into the block wall. We embedded the rods on the side walls, so that the weight was not supported primarily by the rebar rods over the front opening.

Larry then built a form for the insulating layer and the hearth slab. These are poured one after the other.

It all went like clockwork. This has been so much fun. And there's still a lot of work to do! I love working with Larry. He is intensely focused, but still a lot of fun to work with. This is our first oven - we plan on building more: one more on our property in northern Minnesota, but we'd love to build for other folks, too!


Day 2: Build the walls

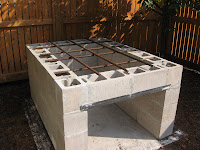
On the second day, Sunday (after church, of course!), we built the walls that will form the support for the oven. This is an area that is used for wood storage as well. Some ovens are built with an ash slot so the ashes can be cleaned out of the oven without bringing them to the front of the oven. We decided against an ash slot and will use a metal can to collect them and them move them away from the oven. We have a small backyard and will be looking at the oven a lot. We didn't want to look at a trash can marring our pretty oven. We used ordinary 8" x 8" x 16" concrete blocks (with a few 8"x8"x8.") and mortar. Larry used the level throughout the building process to keep us level. We used leftover concrete (rubble) to core-fill the blocks. Two pieces of angle iron hold up the blocks above the wood storage opening. We did 2 thing differently then described by Alan Scott . We used one less row of block (His plans called for one row of 4" high blocks to make a 38" working height) We used 4 rounds of 8" block, figuring on making the final working height of the hearth around 36". That's the usual height for kitchen counters and it's a good height for gazing at a fire if we're sitting in our backyard.


Tuesday, September 2, 2008

Day 1: Pour the slab

  • We poured the concrete for the slab today. I floated it, not because it needed it, but because I'd never done it before. According to our plan, the exterior cladding of the oven should extend out to the edge of the slab.


The Oven is Begun


Earlier in the summer, we built a new fence in preparation for building our first wood-fired pizza oven. After that was finished, we dug the hole for the foundation slab and built the forms. We bought mixed concrete and poured the slab on Saturday, built the walls on Sunday and on Monday (Labor Day), we poured the insulating layer and the hearth slab. Look at my 84-year-old mom spread that cement! Way to go, Pat!

Our oven construction is based on the book, The Bread Builders, and also from a custom oven plan that I got when I took a 3-day course taught by Alan Scott at North House Folk School in Grand Marais.